Tuesday, December 22, 2015

Feeling Green for Christmas

I was packing my kitchenware the other day and came across a Christmas tree cookie cutter, which has obviously been sitting in the cupboard for god knows how long. Since Christmas is coming, I thought I could make some festive cookies this year. Since I have been addicted to matcha lately, I decided to make some Matcha Shortbread so that we can all feel more Christmassy :D


This is a very simple recipe, just 4 ingredients. But do note that the dough must be chilled before cutting and before baking. Trust me, it will help to keep the shape better.

Matcha Shortbread

Ingredients 
145g plain flour
1 tbsp matcha powder(use good quality one if possible)
A pinch salt
60g sugar
115g butter


1) Preheat oven to 160C. Combine flour, matcha and salt. Whisk well to combine
2) Cream butter and sugar till light and fluffy
3) Add in flour mixture and gently mix to combine(I use the paddle attachment on the lowest speed) until everything comes together in a soft dough. It should not be sticky. Form into a ball.

4) Place dough between 2 sheets of parchment paper and roll out to 1/2 inch thickness


5) Refrigerate for at least 30 mins

6) Remove dough from fridge. Work quickly and cut out desired shapes. Transfer to a lined baking sheet. Gather the scraps of dough, form into a ball, flatten and refrigerate similarly before cutting again


6) Refrigerate cut shortbread for at least 15mins. Note that I decorated with colored dragees above.
7) Bake for 18-20 mins, until edges are just beginning to brown lightly Do not overbake
8) Transfer to cooling rack. Cool completely before frosting or storage

Simple icing on the edges. See here for icing recipe. I used the border icing recipe.


If you don't like matcha, you can also make vanilla shortbread with this same recipe. Just omit the matcha powder and beat in 1/4 tsp vanilla essence before adding the flour. I made some chocolate-dipped ones and decorated with colored dragees.


Tuesday, November 17, 2015

KFC

Not the KFC from US, but Korean Fried Chicken instead. Sg has been hit by the Korean wave these 1-2 years, with many Korean eateries sprouting all over the island. I used to dislike Korean food, because those I've tried doesn't really suit my palate. But on my sister's recommendations, I've had some pretty good Korean food this year and have also ventured into cooking Korean food at home, like this Yangnyeom Tongdak or 양념통닭. 

Recipe is adapted from The Domestic Goddess's recipe. I have made some changes.
Marinade for Chicken

6 whole chicken wings, tips removed, separate into wing and drumlet(12 pcs in total)
1/2 tsp salt
1/8 tsp white pepper
1/2 tsp grated garlic
1/2 tsp grated ginger
1 tbsp Shaoxing wine

Sauce(mix everything)

2 tbsp gochujang(adjust according to your spice tolerance level)
2 tbsp maple syrup
2 tbsp light brown sugar
1 tbsp soya sauce(I used Japanese shoyu)
3 tbsp mirin
2 tbsp apple cider vinegar
1 tsp grated garlic
1 tsp grated ginger
2 tsp sesame oil

For frying
Potato starch/tapioca starch
Oil

Method:

1) Marinate chicken for at least a few hours(I marinate overnight)
2) Coat chicken with either potato starch or tapioca starch(I have tried using either, both works fine). Shake off excess flour
3) Deep fry a few pieces at a time in hot oil until light golden brown. Drain. Deep fry a second time until a nice golden brown
4) While the chicken is being fried, bring the sauce ingredients to a boil and simmer for 3-4 mins until thicken and glossy.
5) Add in fried wings and toss thoroughly to coat. Sprinkle with sesame seeds and serve hot!


Eat with your hands so that you can lick the sweet, spicy an sticky sauce off your fingers!


Thursday, August 27, 2015

A Green Ingredient

Pandan leaves, also known as screwpine leaves, is one of my favourite ingredient to cook with, especially in bakes and desserts. It has a subtle fragrance which I love very much. There are several pandan recipes on this blog and this time I'm adding a bread recipe for Pandan Pullman Loaf.

Pandan bread is also very common, you can get them in bakeries and also commercial loaves in the supermarkets. However most of them uses the artificial pandan paste/coloring, which results in a bright green color with a strange aftertaste. Pandan leaves are cheap but to get the natural juice from it it's quite a bit of work to blend the leaves and then sifting to extract the juice. Which is why people resort to the artificial ones for convenience. I confess I used to use that too, but as I age(yes, getting older) I try to steer away from preservatives/colorings as much as I can manage.

I adapted and modified this recipe from my Black Sesame Milk Loaf


Pandan Pullman Loaf - 

Ingredients (A) – mix well
280g bread flour
30g TopFlour/Cake flour
15g milk powder
40g sugar
4g salt

Ingredients (B)
5g dry yeast plus 20g water
26g egg (beat whole egg, then measure)
180g pandan juice(blend 1 large bunch cleaned pandan leaves with ~250ml water). See here link for method.

You will need a 
8” by 4” loaf tin with lid


1)Dissolve yeast in 20g water and wait for 5 mins to become frothy. Stir well
2) Mix the yeast with the remaining ingredients in A and B together to form a dough. *Knead into a smooth and elastic dough until it passes the 'window-pane test'.
3) Round the dough, placed into an oiled bowl, cover and ferment until double in size, about 45 mins to 1 hour


4) Punch down the dough to release some air. Rest dough for 5mins. Remove 100g dough - form 1 large ball or 2 small ones(reason being I find if I use all the dough it will be too much for my loaf tin). For the remaining dough, shape dough into a loaf and place in a greased/lined tin. Cover with cling wrap and let rise until dough has risen to about 1.5 times the height(it should still be below the rim of the tin), about 35minutes.
5) Grease the lid of the pullman loaf tin well and slide in to cover
6) Bake in preheated 180C oven for 20 mins. Carefully remove the tin and continue baking for 8-10 mins to brown the top


I used my Kitchenaid and kneaded for a total of 25 mins on Speed 2. It will be sticky at first. Be patient, the dough will leave the bottom of the bowl around 10-15mins. Resist the temptation to add more flour before this as it will toughen the bread.

Completed! Very soft and pillowy, even on the next day! :D


Served with kaya and butter, complete with kopi-o for a traditional Singaporean breakfast set!


Or if you prefer a more western style, pan fry the egg-coated slices for French Toast! Served with fresh fruits here.


Wednesday, July 29, 2015

Revisiting an Old Friend

Like I mentioned previously, I started blogging again partly because I found a lot of memories while browsing the blog for recipes. I am pretty active on Instagram so have been inspired by a lot of accounts, some of which feature talented bakers who churn out beautiful loaves of bread. That ignited the passion in me to start bread making again!

Before starting to blog again, I have already made 2-3 kinds of breads, mainly the soft loaves. It is only a matter of time before I venture back to my old love - artisanal European style loaves like this:


This is from an old recipe - the Beer Bread which I had made 8 years back. I chose this to start my hearth bread making because I went shopping with my sister at ToTT  recently and saw that they sell banetton baskets but these are really expensive! It reminded me of this boule, which I made the design using a plastic colander! No need to spend unnecessary $$.


Very happy with the final product, except I should have slashed the surface deeper so I get a more pronounced split. Never mind, more chances to practice that in the future.


All sliced up, resting on my baking stone, which has been safely stowed away all these years :D. Click here for this Beer Bread recipe. Note that I omitted the walnuts this time.

Used the bread to make a Tuna Avocado Sandwich


Thursday, July 09, 2015

The Forbidden Seeds

I'm blessed to have made a couple of close friends during my Pilates instructor training. During those days, we would see one another in the studio whenever we go for self practice, and some of us are also partners, using each other as our 'practice body'. After our exams, while most of the batch just went their own ways and we never saw each again, a few of us stayed in contact via our Whatapps group and we meet up regularly for makan sessions :D

During our last gathering, one of them bought 3 of us(who likes to bake) some poppy seeds. I'm so touched that she remembered  from our previous conversations that we would love to get our hands on some poppy seeds. In case you are wondering, poppy seeds are banned in Singapore. I think the authorities feared that we, laymen, are able to grow the opium plant from that, and become illegal drug dealers, LOL.

Poppy seeds are commonly paired with lemon in baked goods. I decided to try another citrus and see how it will turn out. A normal butter cake would be so boring. What about a chiffon?


Chiffons are notoriously finicky cakes, well, at least to me. It's all about whipping the egg whites to the right consistency. Underwhip and the cake will not rise to its full glory, overwhip and the whites will weep, literally. I have included some pics below which hopefully will be useful.

Orange Poppy Seed Chiffon Cake

100g cake flour(I use Top Flour)
1 tsp baking powder
1/4 tsp salt
55g sugar

20g poppy seeds
Zest of one orange

60g neutral-tasting oil*
6 egg yolks

90g fresh orange juice


6 egg whites
1/4 tsp cream of tartar
55g sugar
1)Pre-heat oven to 180C. Have a 9-inch ungreased tube pan ready.
2)Sift flour and baking powder 3 times, add in salt and 55g sugar. Whisk to mix well and make a well in the centre.
3)Into the well, add in oil first, followed by egg yolks and orange juice. Using the whisk, combine until smooth. Do not stir vigorously.
4)Sift the mixture into another bowl using a fine sieve to remove any flour lumps. Add in poppy seeds and orange zest. Whisk gently to mix


5)In a clean bowl of a stand mixer, beat egg whites with cream of tartar and beat until there are no more large bubbles. Add in 55g sugar gradually and beat until stiff peaks.


6)Add about ¼ of the beaten egg whites into the egg yolk mixture and gently stir with the whisk to lighten the mixture.


7)Gently fold in the remaining egg whites using a spatula. FOLD, NEVER stir the mixture or you will risk deflating the delicate egg whites


8)Pour mixture into the pan and bake for 45-50 mins or until cooked.
9)Immediately invert the pan and let cool completely before unmolding.

* I use 30g coconut oil and 30g macadamia nut oil because that's what I have left. Feel free to use other neutral-tasting oil.

Tuesday, July 07, 2015

Chia Chia Chia

Chia seeds have been very popular in recent years. These seed are native to central and southern Mexico and Guatemala, although I have bought some which states it's from Bolivia. The popularity stems from the seeds nutritional content - they are packed with proteins, antioxidants, fibre and other nutrients(you can google chia seeds to read more).

I have also jumped onto the chia seeds bandwagon, more so because I was looking for alternative breakfast options, other than oats(will share more on oats in another post). Google is really our best friend, because there are tonnes or recipes and ideas for chia seeds. I get my inspirations from food blogs and instagram accounts. I came up with my own version of chia pudding and there are endless ways one can top the pudding with. I have a basic recipe below and some ways I have used them with.

Chia Pudding(Basic Recipe)

2.5 tbsp chia seeds(black or white)
125ml(1/2 cup) milk(can be dairy, coconut, soy, nut)
Sweetener to taste(sugar, honey, maple)

Mix all the above in a container. Let sit overnight in the fridge. It should have thickened considerably to a pudding texture. If you find it too thick add a bit of milk to thin it out.

How to to serve?

Papaya Chia Parfait - blend one wedge of papaya. Layer and top with strawberries, blueberries and unsweetened coconut flakes


Chocolate Chia Parfait - add 2-3 tsp(depends on how much you love chocolate :p) dark cocoa powder to the basic recipe. Top with Greek Yogurt, blueberries, chopped apple


Matcha Chia Pudding - as matcha powder is difficult to dissolve, add 3/4-1 tsp(different matcha powder have different intensity, so adjust accordingly) matcha powder to liquid first, mix well before adding the chia seeds and sweetener. Serve with fresh mangoes, pink grapefruit and coconut flakes


Coconut Chia Parfait. Instead of soaking in milk, soak in coconut water. Layer with mango puree , blueberries and home made granola


Mango Chia Pudding - puree mango and use it to soak the chia seeds. Serve with Greek yogurt, pink grapefruit and blueberries


Dragonfruit Chia Parfait(my fav color!). Puree pink dragonfruit and soak chia seeds. Layer with fresh mangoes, granola and red kiwi.


Sunday, July 05, 2015

Black Is In

Recently went back to bread making, after stopping for so many years. Realized it's still a lot of fun making my own bread, because I get to control what goes into each loaf/bun, without the nasty preservatives/additives that manufacturers add to commercial loaves. 

Straits Times Life published an article about black food items a few weeks(or months?) back. I must say I agree that black gives a great contrast and makes the eyes pop. So I decided to venture into the world of black as well.


Squid Ink Mini Burger Buns

Ingredients (A) – mix well
185g bread flour
20g TopFlour/Cake flour
10g milk powder
20g sugar
2.5g salt

Ingredients (B)
3.5g dry yeast plus 15g water
15g squid ink, dissolve well in 120g water
18g egg (beat whole egg, then measure)

White sesame seeds

1)Dissolve yeast in 15g water and wait for 5 mins to become frothy. Stir well
2) Mix the yeast with the remaining ingredients in A and B together to form a dough. *Knead into a smooth and elastic dough until it passes the 'window-pane test'.
3) Round the dough, placed into an oiled bowl, cover and ferment until double in size, about 45 mins to 1 hour.
    Pic shows rounded dough before fermentation:


4) Punch down the dough to release some air. Rest dough for 5mins. Divide into 5 equal portions. Form each into a tight ball and set onto lined baking sheet.
5) Cover with oiled plastic wrap and let rise for 30-35mins
6) Brush top with beaten egg(additional), sprinkle sesame seeds and bake in preheated 190C oven for 15 to 18 mins until golden brown and cooked through.


I used my Kitchenaid and kneaded for a total of 24 mins on Speed 2. It will be sticky at first. Be patient, the dough will leave the bottom of the bowl around 10-15mins. Resist the temptation to add more flour before this as it will toughen the bread.

I used them for 2 different kinds of burgers, the first being salmon burger with curry aioli:


The other is Korean-inspired taste - Korean sweet & spicy chicken burger


Final variation is a beef and guacamole burger.


Shall share the Korean chicken and salmon burger patty recipes next time!

Friday, July 03, 2015

Yo What's Up?

It has been 8 years since I blogged so what have I been up to? Well, making a living to survive. Haha!

I made a career switch last year! From my job(different companies but similar job scope) of almost 12 years, I switched to something that I'm never trained in. So the first thing I had to do was to undergo a year of training, after which I took the certification exam and passed!

The one year of Polestar training was a grueling one, but I'm fortunate enough to land a job in a Pilates studio where I could use the facilities to practice. Many of my course mates had to juggle full time work with training and it's really hard for them.

Well, after one year, all that hard work paid off and now I'm a fully certified Pilates instructor :D. I sacrificed a high pay and fixed working hours for a lower pay and irregular working time now. Is it worth it? Totally! Now I'm able to help others achieve what I have been able to achieve with Pilates. It gives me an immense sense of achievement, which is not something I can get with monetary returns.

What is Pilates you may ask? If you already know what Pilates is about, or wish to find out more, feel free to contact me. I will also be sharing with you in future posts all about Pilates!

Image from the world wide web

Wednesday, July 01, 2015

Hello Blog World!

Hello there! I've been toying with the idea of re-activating this blog for the past 1-2 months. It all started when I was searching this blog for my bread recipes. Went through the posts and found a lot of memories here. Coincidentally my sister brought up this topic and gave me some great ideas. So after much consideration I decided to start blogging again!

Trying to make blogging a stress-free hobby, I have decided that I will not only be sharing cooking-related posts, but can be food reviews, random musings or others, at my own time and leisure. The photos may not be blog-perfect but who cares! 

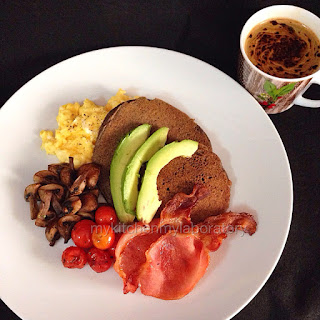
Now onto my first come-back post. A buckwheat pancake recipe which I attempted today. I adapted it to what I have in my own pantry. They turned out light and fluffy despite the use of all buckwheat flour(which tends to make baked goods dense). 


Makes 3 big and 1 small pancake(depends on how big you like your pancakes).

63g buckwheat flour(I used the brand Origins)

1/2 tsp baking powder 

1/4 tsp baking soda

Pinch of salt

100g buttermilk*

3/4 tbsp maple syrup 

15g butter, melted
Whisk together dry ingredients

Add in liquid ingredients

Whisk gently to mix(some small flour clumps is ok)

Cook pancakes until golden brown on both sides. 

Keep cooked pancakes warm during the cooking process. I cover them with a piece of foil. Cold pancakes are so not nice. 


* Can be store bought. Or make your own by adding 1/2 tbsp fresh lemon juice into 100g milk. Set aside for 5 mins for it to thicken. 

Serve with fresh fruits, maple syrup, bacon, eggs or whatever you desire.


With sunny side up, avocado and red pepper flakes


A video of egg porn :p